
Spring Cache
What is Spring Cache? How to configure it in your project and how to use it? How does Spring Cache work? How to add an external provider that allows flexible management of our cache?
It is a mechanism that allows you to temporarily store data in memory that has already been used once. The purpose of this is to increase the speed of access to this information, when it is potentially needed in the near future. This mechanism allows you to limit the number of queries to the database, or the number of external calls to the services we use. The cache is used in virtually all systems. Starting with the hardware. The creators of Spring also made sure that the cache that we can use can be used in multi-threaded applications
Spring-supported CacheManagers can be divided into:
- using Spring’s internal mechanisms, e.g. ConcurrentMapCacheManager, SimpleCacheManager.
- enabling the configuration of external providers, e.g. CaffeineCacheManager, EhCacheCacheManager, JCacheCacheManager, RedisCacheManager.
How to configure and use Spring Cache?
First we need to add dependency

If our application uses Spring only, we should use:

To enable caching we need to add annotation, much like enabling any other configuration level feature in the framework. We can do it by adding the @EnableCaching annotation to any of the configuration classes.
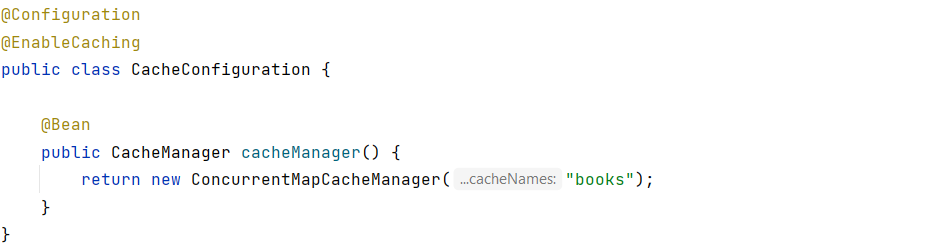
After we enable caching, for the minimal setup, we must register a cacheManager.
When using Spring Boot, the mere presence of the startup package in the classpath next to the EnableCaching annotation will register the same ConcurrentMapCacheManager. So there is no need for a separate bean declaration.
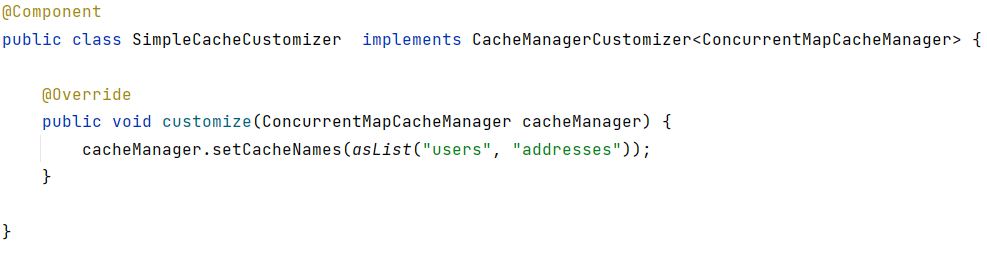
In addition, we can customize an automatically configured CacheManager with one or more CacheManagerCustomizer
We start our adventure with adding a cache on individual methods with the @Cacheable annotation. This annotation is used for methods that retrieve data but do not modify it. It also has parameters that we can and even have to set.

The getCustomerAddresses() call will first check the cache addresses before actually invoking the method and then caching the result.
Now, what would be the problem with making all methods @Cacheable?
The problem is size. We don’t want to populate the cache with values that we don’t need often. Caches can grow quite large, quite fast, and we could be holding on to a lot of stale or unused data.
@CachePut
This annotation is added on methods that modify the data. It allows for the fact that when the method with this annotation is called, it updates the given cache entry, so that we always have the most recent changes that we can use. It is important here to add parameters as in the @Cacheable annotation. So we need to set cacheName. In this example, we want our key to be id, so we need to extract it from result (this is the object that the method returns to us, i.e. the returned object = result):

@CacheEvict
That annotation allows us to clear the cache. We add it on methods that delete data. Thanks to this, in the case of calling the method that removes some data, our cache will also be cleared from this entry. This saves space in the cache memory and is more difficult to fill it because it does not have unnecessary data, but also allows you to maintain consistency between the main data source and the cache. Traditionally, it is obligatory to add cacheName and key, but in this case we can omit the key, because the key will be id, which is in the method parameter:

As you can see, using the cache is important in the application when we want it to be fast and efficient. The cache is a very important part of the system and we shouldn’t skip it.
Comments